Killing Two Birds With One Stone - Securing a UniFi Cloud Controller on AWS

This blog post is well overdue for many reasons. First I am excited to be back after taking a short break. The holidays came and I got a bit lazy. I then got sick but not from covid thankfully. I still don't know what I had, but it was pretty similar to the symptoms that those with covid experience. Now fully recovered, I kept telling myself that the topic of my next blog post would be about my UniFi Controller. As prior posts have mentioned, I currently host the application in AWS using an EC2 instance of Ubuntu Server. Why did I decide to blog about this next? As the title of this blog says, I wanted to go over something that I had not thought much of until reading more forums about properly securing a UniFi Cloud Controller running in AWS.
Background
To begin, I wanted to first address that at the time of writing this blog post, the instructions I initially used to run a UniFi Controller in AWS from Ubiquiti seem to be gone. One of the reasons why I wanted to link this guide here was because it lacked any consideration into the security implications of hosting the UniFi Controller in AWS without first properly taking adequate security measures. I did not think much of it until I pieced the pieces together months later of how essentially our instance hosting the controller/application was open to the whole world. Not only it is important to scrutinize such details, but it really opened my eyes on how such details were missed completely! To summarize, Ubiquiti states that a security group in AWS such as the following should be created where ports 3478, 8080, 8880, 22, and 8843 are allowed for all inbound traffic/connections with a source IP address range 0.0.0.0/0. AWS does include a warning when creating such inbound rule for the first time where source is set to 0.0.0.0/0. However there are no restrictions in place that prevent such action such as a PIN or some other additional layer of security to ensure that the action is authentic or intentional and not someone malicious opening up your instance to the whole internet! Now lets take a look at my security group. Ignore for now the other rules Lets Encrypt, and Cockpit Control Panel Access. I will go over what those rules are for later in this blog post.

As a requirement for setting up UniFi Cloud Controller application ports 3478, 8080, and 8443 need to be opened to the internet. The other ports 8880, and 8843 are included because those ports were also mentioned and set up when I initially set up my UniFi Controller. However they are OPTIONAL, only needed if you intend to use guest portal functionality mainly used in corporate environments and not needed for at home UniFi setups. I should probably take the time later to delete those rules as this is not applicable to me. There is one port that I did not include in this list and that is port 2222. As you can see the description of this rule is set to SSH. This is indeed the port I specified for SSH. I will go over why I made this change later but the port I specified before was of course 22 as that is the default port of SSH. With the security group now defined, let me go over the rest of the security measures that were taken.
Research
I ended up following these guides here and here both very excellent and easy to follow for accomplishing the remaining security measures I took. Although both guides accomplish the same exact thing and serve the same exact purpose, the latter does take more diligent emphasis on hardening the server itself while deploying the UniFi Controller. This is why I decided to include this guide as not only does it satisfy it's intended purpose, but the author Chris from Crosstalk Solutions goes above and beyond to take the time to address those best security practices that not only make your system more secure, but aren't difficult to implement either! The best of both worlds as I see it. Starting at part 6 "Secure SSH Settings", there are several settings Chris suggests to tweak. In the /etc/ssh/sshd_config file, Chris suggests changing the PermitRootLogin line to say No instead of Yes. Note that in my configuration, the PermitRootLogin line is commented (#). It was already like that without having made any changes to my sshd_config file. So this may be just how other Linux distros also have the sshd_config file setup as default, as it's a best security practice to take proper care in using root for anything. So as long as this line is commented out, you do not need to take any action here.
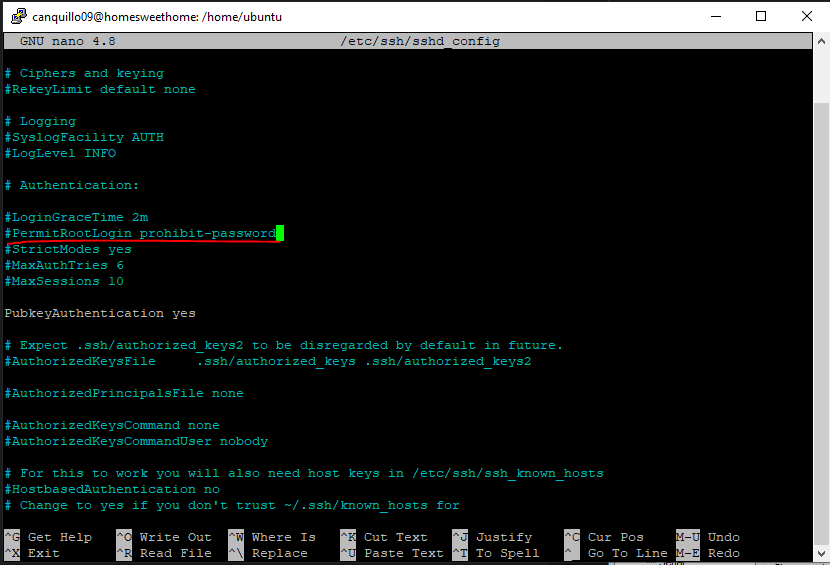
In the PasswordAuthentication line, the default is "yes". Make sure to change this to no. Lastly ensure that the PubkeyAuthentication line is set to yes as this is the method of authentication that will be used for SSH over password authentication.
PuTTY
PuTTY is a well known terminal emulator application useful for many things. I first used it back in my Linux systems administration class in junior year of College. I am well aware that there is no need for PuTTY anymore as there is now WSL or Windows Subsystem for Linux and even an OpenSSH client for PowerShell. However I decided I wanted to make sure I had PuTTY on both my laptop and my desktop. I also wanted to follow the guide more closely and get back to using this amazing application just like how I was using it during my Linux systems administration class. Apart from having the convenience of being able to SSH into your instance without logging in to AWS and using AWS's EC2 Instance Connect like in my setup, you can also rest assure that while using PuTTY you should not experience any disconnects or timeouts while connected to your instance. For example, I cannot count the number of times where while using EC2 Instance Connect, my connection to the instance would freeze. The terminal would just freeze and I was still connected to the internet via LAN. I did not bother doing research to see if this was simply intended behavior or some kind of bug, but I got used to it but it did bother me. That is when I decided to use PuTTY as my SSH client. Not only was this a nostalgic experience for me, but it was a worthwhile one too because I have not experienced any troubles with PuTTY. The only trouble I experienced but completely my fault for not reading instructions carefully was when I needed to paste my public key into the authorized_keys file. When you create your private/public key pair as described in part 5 of Chris's guide, in part 8 you need to convert your private key to PuTTY format. Luckily for me I did not have to do any ssh key generation as described in part 5 as I had already done this when I created my first instance in EC2. This same private key can be used for any of your EC2 instances which you want to SSH into. Since the private key is saved as .pem, it won't be recognized by PuTTY. You will need to generate the key in PuTTYgen so it can be converted to .ppk format instead. So whichever way you generated your private key and public key pair, load your private key by clicking on Load and search for your private key. If you load your private key successfully you should see this prompt.
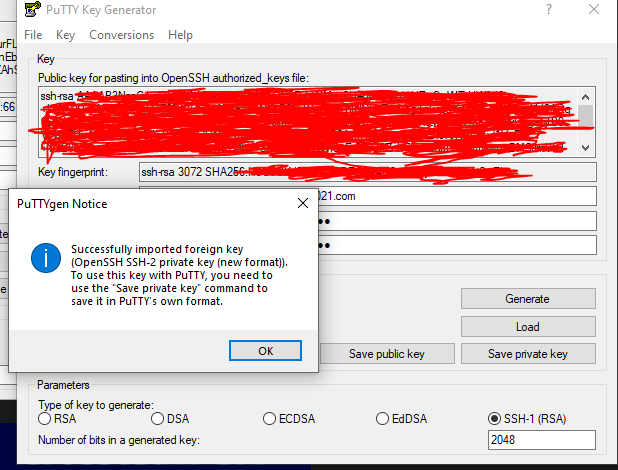
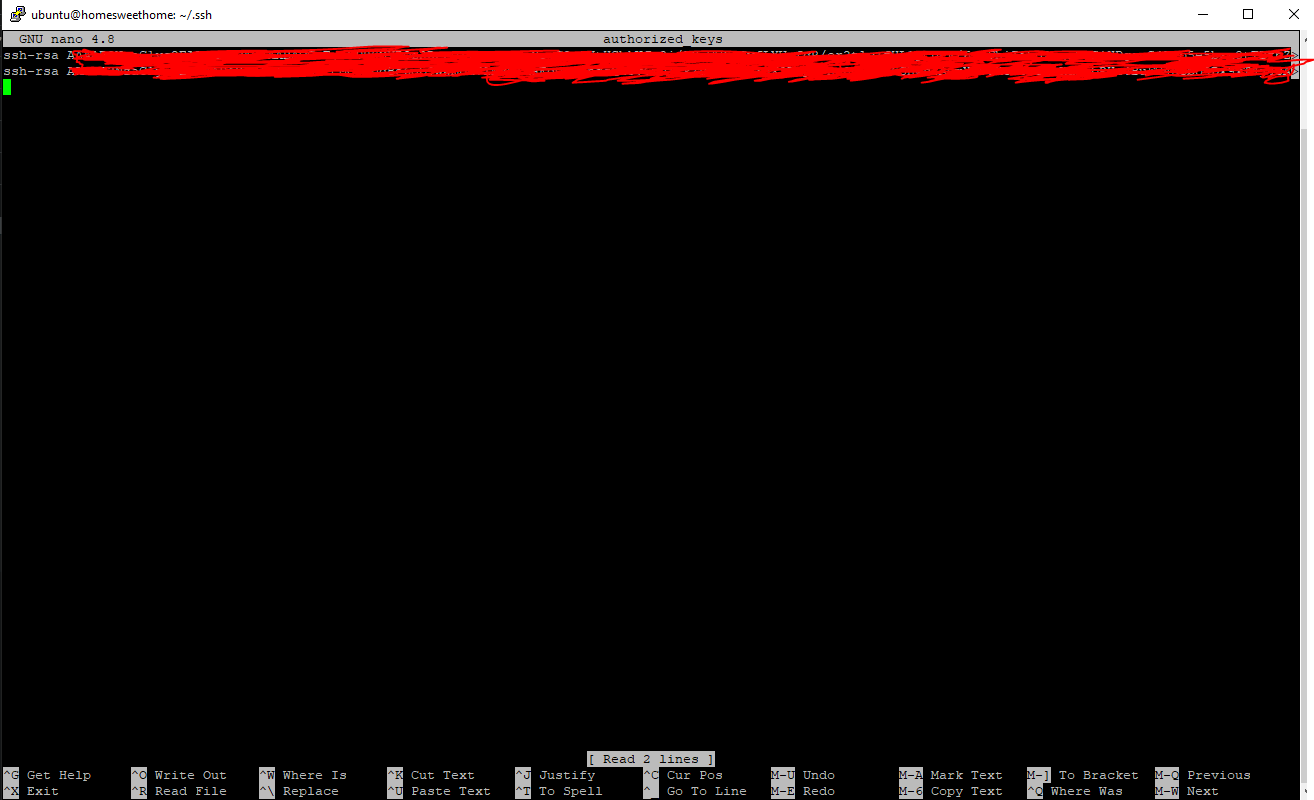
With the private key imported, select RSA as type of key generated and leave the number of bits in a generated key as 2048 bits. Lastly create a passphrase to add an additional layer of security. This passphrase will be used along with your private key when you SSH to the instance using PuTTY. Do not forget your passphrase! Save it somewhere safely!! Make sure to also paste your public key into the authorized_keys file in a SINGLE LINE like this.
PuTTY makes things easy by allowing you to save your connection settings. If you go to SSH then expand by clicking on +, then Auth, click on Browse for your private key for authentication. The same key you generated using PuTTYgen will be used. Once done here, head back to Session and enter in the hostname of your instance along with the port number for SSH. Before clicking on Open, create a saved session. Name it anything you want. This simply just allows you to connect with saved settings such as your private key and the hostname and port number. Finally click save and load. You should see your connection settings. Click on open and you should be prompted for a passphrase for your private key. If entered correctly, you should be connected to your instance! The last thing to go over is how you should change your SSH port. I changed mine to 2222. You can do this in the sshd_config file in the /etc/ssh directory. Save settings and run sudo systemctl reload sshd. I would also reboot your instance though this is not required. Next make sure to adjust the security group of your instance so that the SSH port is set to 2222 instead of 22. DO NOT use UFW as this accomplishes the same exact thing and you can lock yourself out of your instance for having duplicate firewall rules. If you're using AWS like me, simply use the built in EC2 security groups functionality. Edit the port to 2222 under Port Range, and Source to YOUR IP ADDRESS! Once done here, make sure to change the port also in PuTTY then save again your session and load your session connection! You should now be able to SSH to your instance using the new port!
Discovery
While troubleshooting authentication issues for SSH involving the public key I needed to paste to the authorized_keys file, I had entered the following command:
tail -f /var/log/auth.logUpon entering the command, I discovered that while I had the settings that Ubiquiti advised for my security group to be set so that source IP address be set to 0.0.0.0/0 for SSH, various SSH bruteforce attack attempts were being made on my instance. Right away I checked to see if the listed IPs have been analyzed before in VirusTotal and they indeed were. I even checked to see if anyone else in the community had gathered any additional info about the malicious IPs like other forms of attacks to remain vigilant and be prepared to act quickly in case my instance were to be attacked. Below is the information I uncovered.


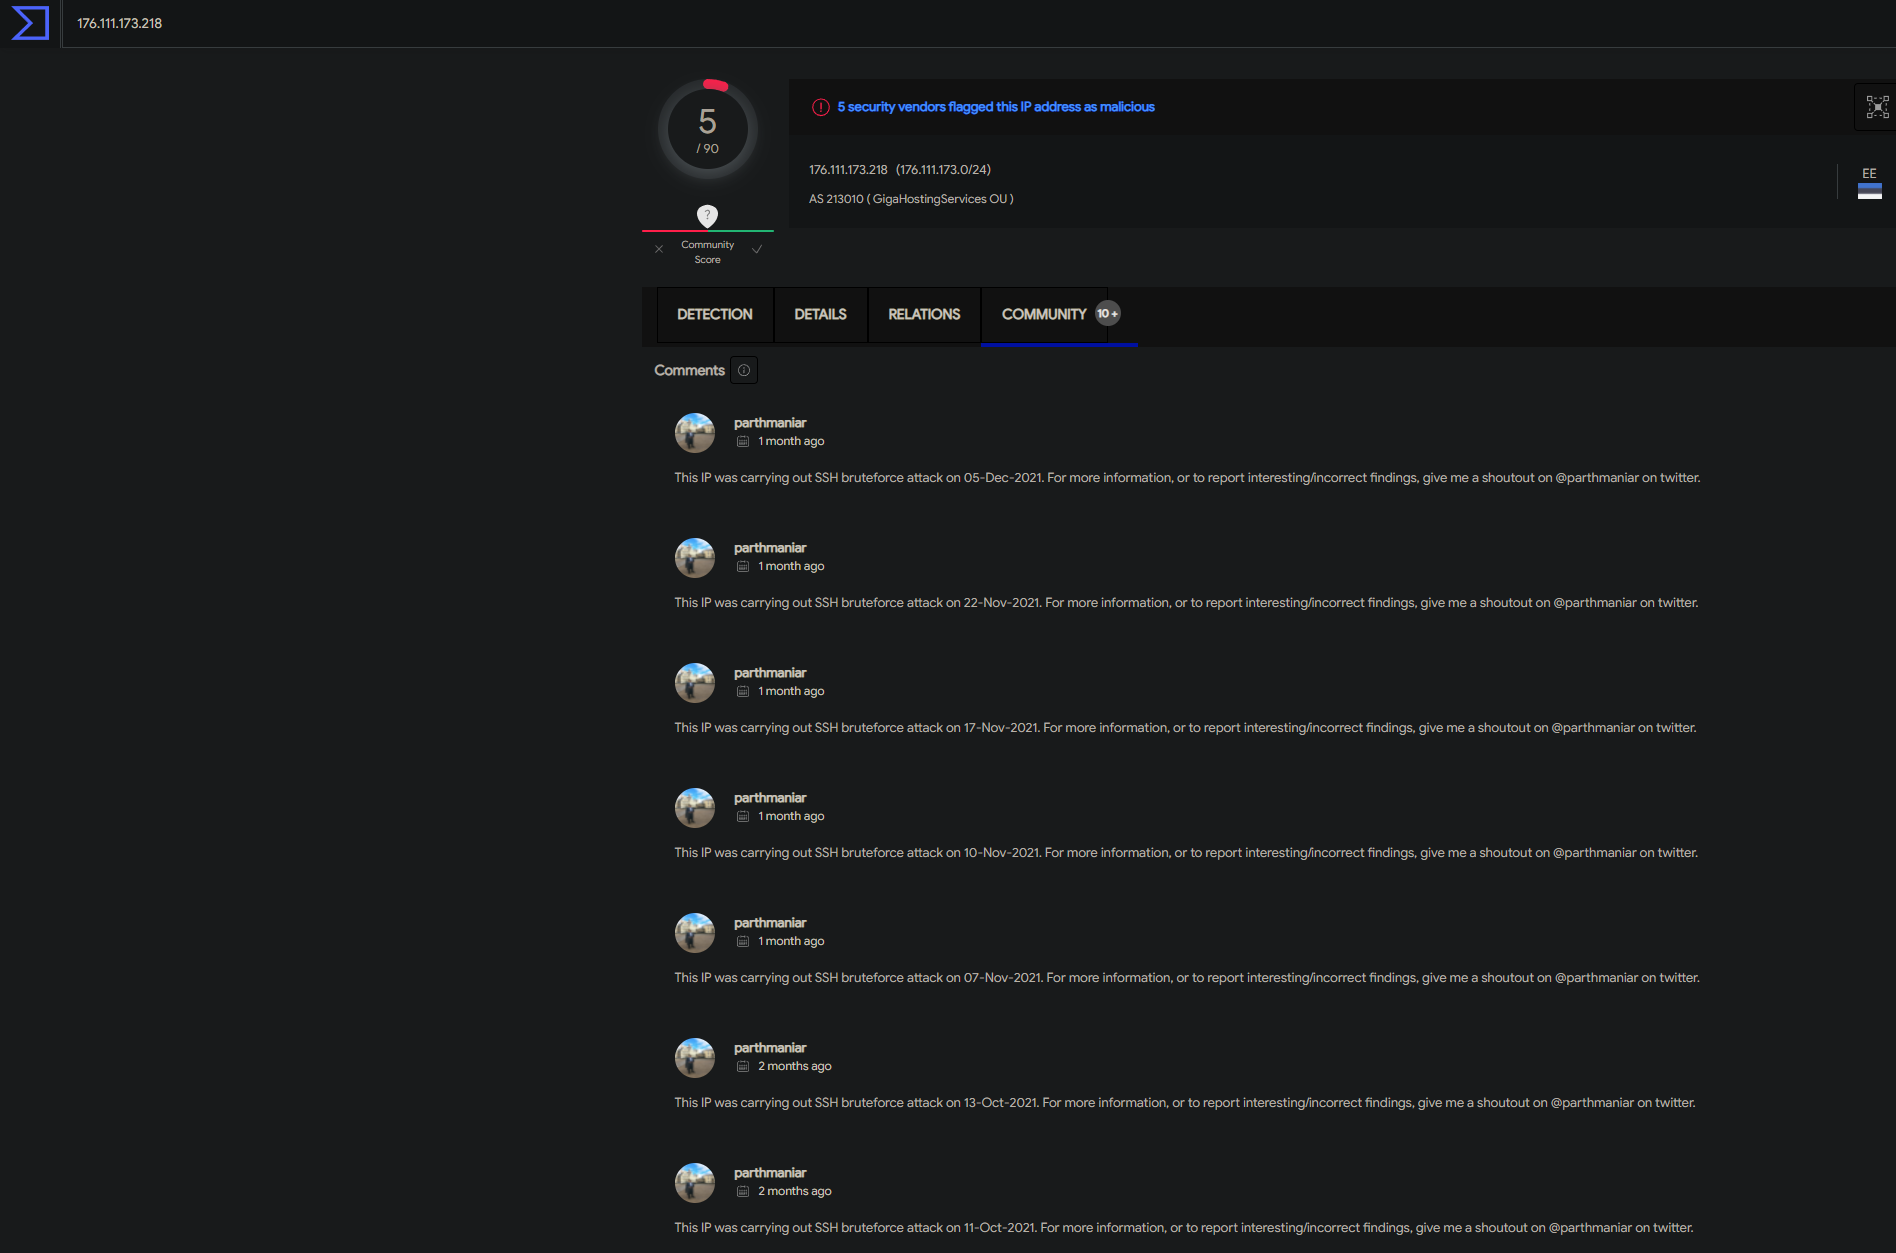

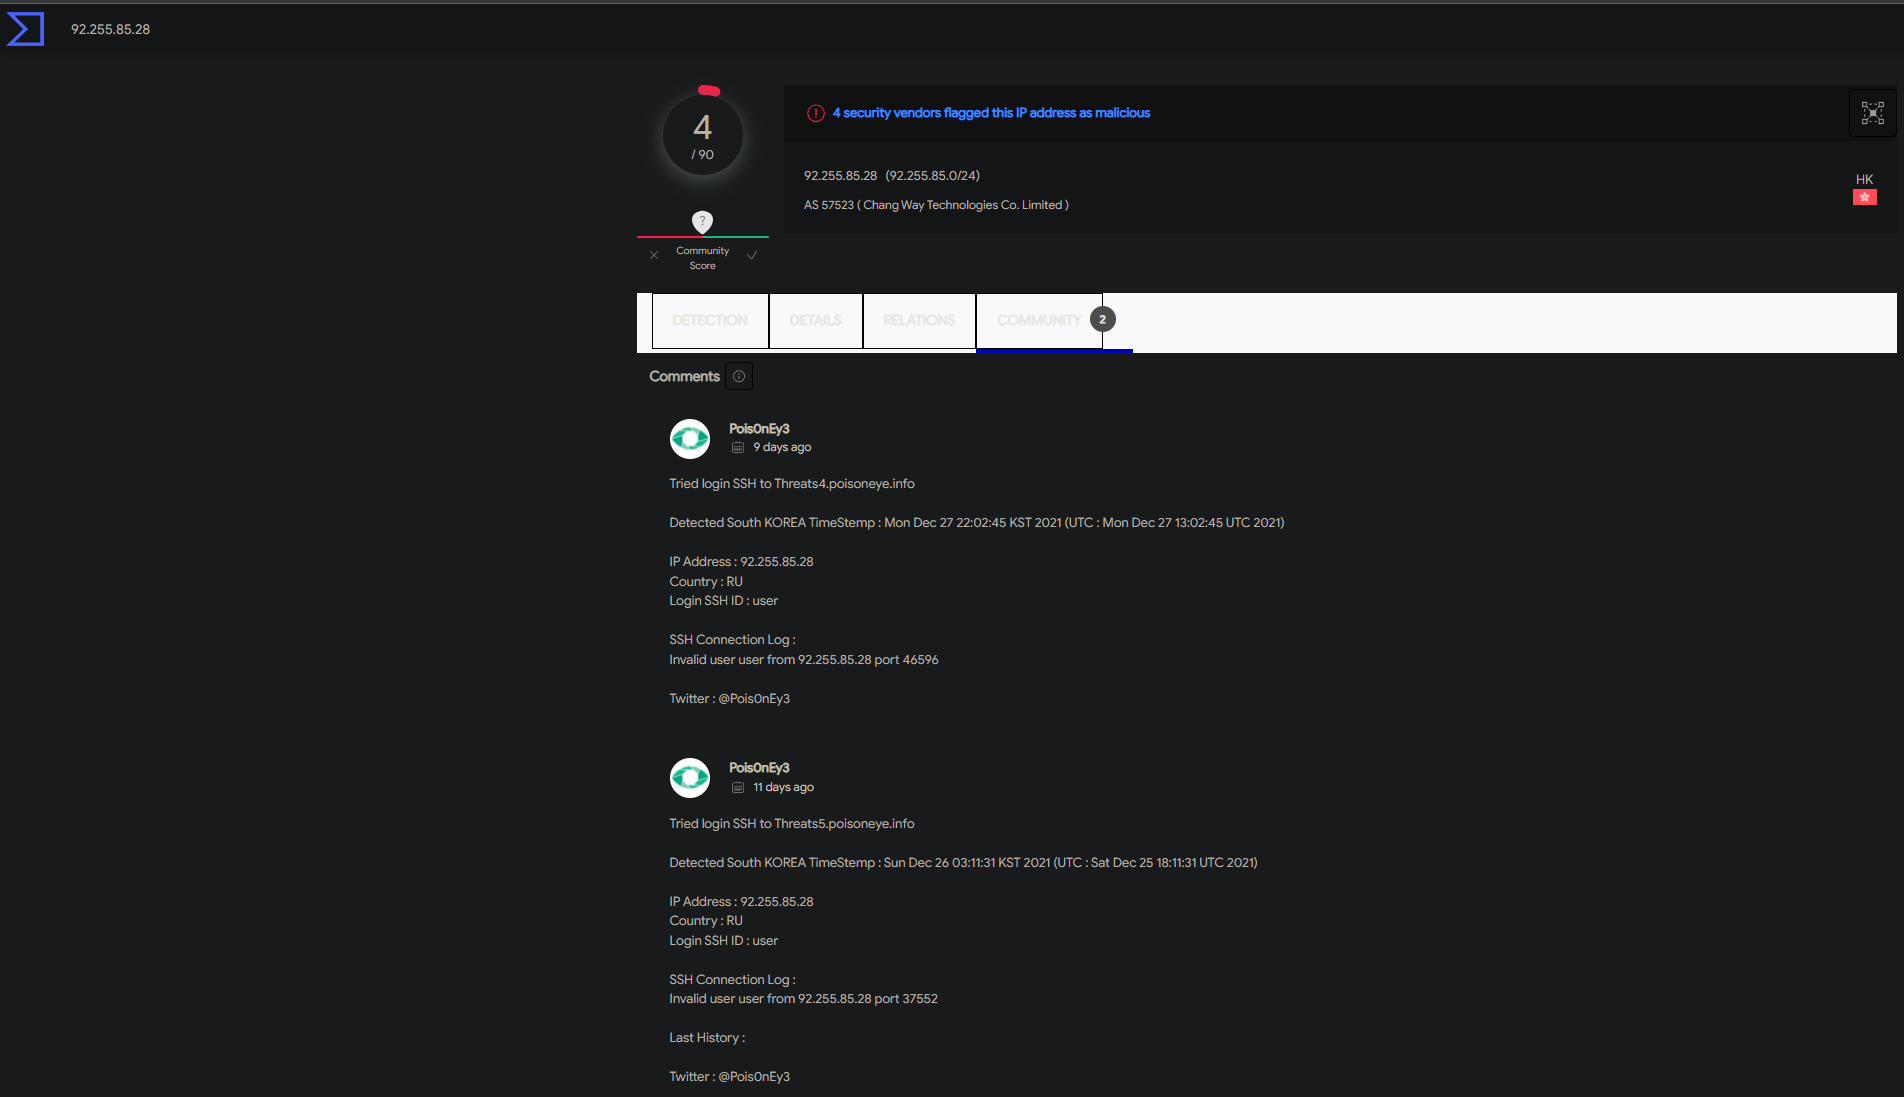
Not only is this a clear indication that having our instance exposed to the whole internet is a bad security practice, there should be further hardening taking place if there happens to be a concrete reason why a specific port needs to be opened to the whole internet. Such action should also be documented detailing why such a decision was made, and how that decision can bring risk and what measures are going to be taken to mitigate that risk. This was a rewarding experience for me because I was not expecting to come across such a discovery while troubleshooting authentication with SSH. This just shows that there is much more work to be done to further harden our system. I can tell you that having dealt with a much worse event at a former company, it's important to stay calm in these situations and look to see if there is an actual compromise and how bad the compromise is or as a former coworker of mine called it blast radius. The last important mention I want to make is that I am a firm believer that there is always something more that can be done to secure a system. One should NEVER be content with anything you do in security. It's important to place yourself in the adversary's shoes and have the mindset of someone who wants to do something malicious. I like to also see it as that person being ahead of the game and it's your responsibility to play catch up so that you're able to figure out their next plan. I like to describe it as having a pessimistic mentality with justification especially if there was evidence of a compromise! Having this type of mentality and continuing to remain vigilant are what I strongly believe to be the epitome of ingrained cyber hygiene for any entity or individual.
Cockpit Control Panel Access
Another security measure taken was installing Cockpit. Install using the command:
sudo apt install cockpit -yConfirm access by logging in using your user credentials at https://[server IP or FQDN]:9090 . Cockpit is a "web-based graphical user interface for servers, intended for everyone." On Cockpit's site here, the program is described as intended for those new to Linux, familiar with Linux, and expert admins. One thing that immediately caught my attention when looking through the site was this screenshot here.
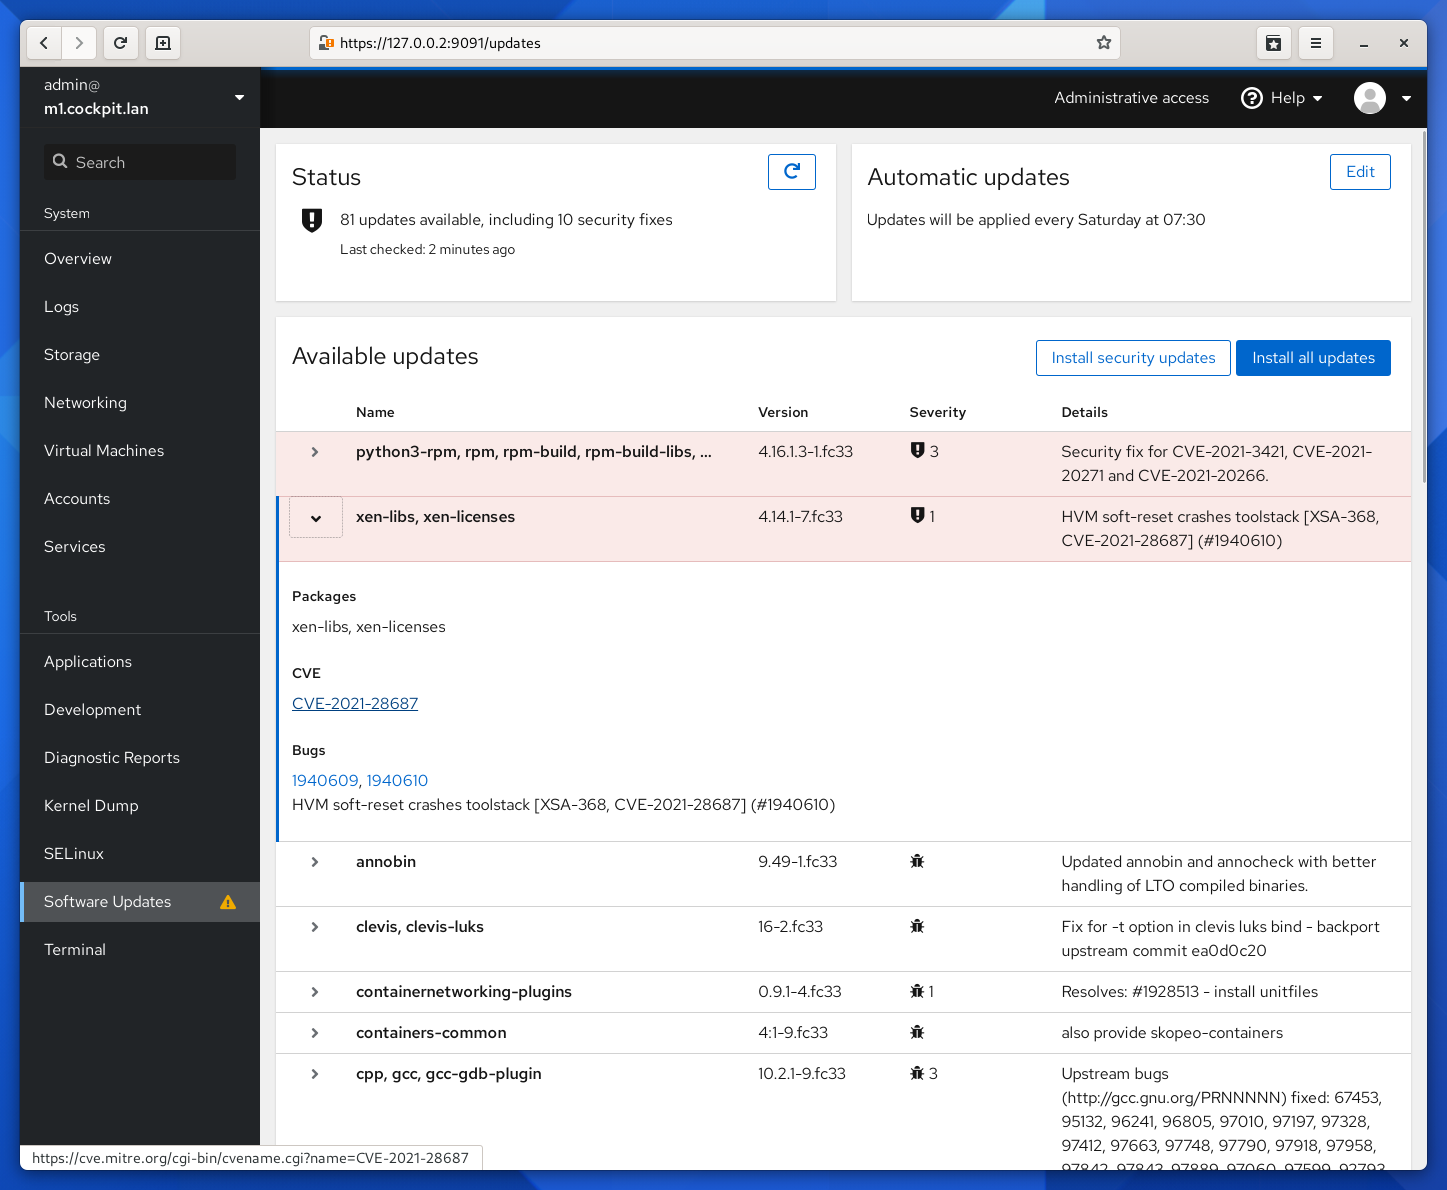
I am able to see available updates along with the severity level of those updates as well as links to CVEs all on a single page. This allows an administrator to prioritize updates based on the severity level. For example one can see how much risk is being taken if one were to apply an update to an update classified with a severity level of 1 over 3, or any other severity levels for that matter when reading more about the listed CVEs. The reason I mention this is because in many organizations, updates are applied differently from what I had witnessed at my former company and others. For those organizations that lack the maturity and resources, updates are applied on a case by case basis. There is no framework or pillar in place that describes how updates are applied and how such process is enforced. In other words, how are you sticking to what is written on paper? This is why this screenshot caught my attention. It helps facilitate such process especially in a Linux environment where you have many packages and some may be dependent on legacy software, and as a result you cannot update such package or software because it will simply break or no longer be supported. Although this may be very rare, it is still a scenario one may encounter.
Let's Encrypt
The last security measure Let's Encrypt will be used to secure communication with the server where instead of using HTTP, we will use HTTPS. It will essentially be used to get rid of the not secure warning when you browse to UniFi by generating a certificate. I ended up following Chris's guide, as well as Certbot's which is the actual client Let's Encrypt uses for generating certificates, and lastly this guide from Nginx. On this page, select how your HTTP website is configured. For me this was something tricky because of two things. One I was not following the guide exactly part by part because my config is different from how Chris the author setup his server, and secondly this meant I needed to decide whether I was going to follow the guide, or just use my config so that I don't need to install anything extra that is not necessary, which covers the same purpose like installing Apache since I already use Nginx as my web server. So please be mindful of this! To ensure there is no confusion, select the software and system your setup closely resembles. Don't worry about the mention of the HTTP website. Just select how your webserver is setup in this case our instance of Ubuntu Server 20.04 LTS using Nginx. So I selected software Nginx and system Ubuntu 20. Once you select your software and system, Certbot will automatically provide the commands needed to get Certbot up and running. I strongly recommend you follow Certbot's instructions. I did read up why I could not just use apt to install Certbot but in this case you should use snapd. Snapd already came installed on my server. If this is not the case for you, read here for specific install information for your system. Run this command to ensure snapd is up to date:
sudo snap install core; sudo snap refresh corePart 4 in the Certbot instructions "Remove certbot-auto and any Certbot OS packages" was not applicable to me. Make sure to verify this in your setup. Next run the two commands:
sudo ln -s /snap/bin/certbot /usr/bin/certbot
sudo certbot --nginx
You will need to enter your FQDN as well as an email address as part of generating and renewing the certificate. If you navigate to https://yourwebsite.com/ the domain you gave your UniFi site, you should see that your site is secure. However a page of Nginx will show. This is because we need to import our Certbot certificate to UniFi as our very last step to finalize our Let's Encrypt security measure. In other words we need to tell UniFi to use our generated Certbot certificate!
Import Certbot Certificate to UniFi
Using a script from Steve Jenkins in GitHub, we can import our Certbot cert to UniFi. The script can be found here. The instructions provided by both SimpliWiFi and Chris did not work for me. So instead I had to google the author of the script and from there search for the script. I ended up clicking raw on the script page and copying and pasting the raw contents of the script into a file I created myself on the server called the same name of the script unifi_ssl_import.sh . Next depending where your script is saved run this command:
sudo chmod +x /usr/local/bin/unifi_ssl_import.shWe are not done yet! Now we need to edit the script. Using either vi or nano in line ‘UNIFI_HOSTNAME=’, change it to your FQDN. Next you want to comment the lines that mention another flavor of Linux and uncomment the flavor you're using. So for me I am not using Fedora/RedHat/CentOS. I would # each line that mentions such flavors of Linux. Now I would remove each # that mentions my flavor of Linux which is Debian/Ubuntu. The last line to edit is LE_MODE =no from no to yes. Save and exit. We can now run the script:
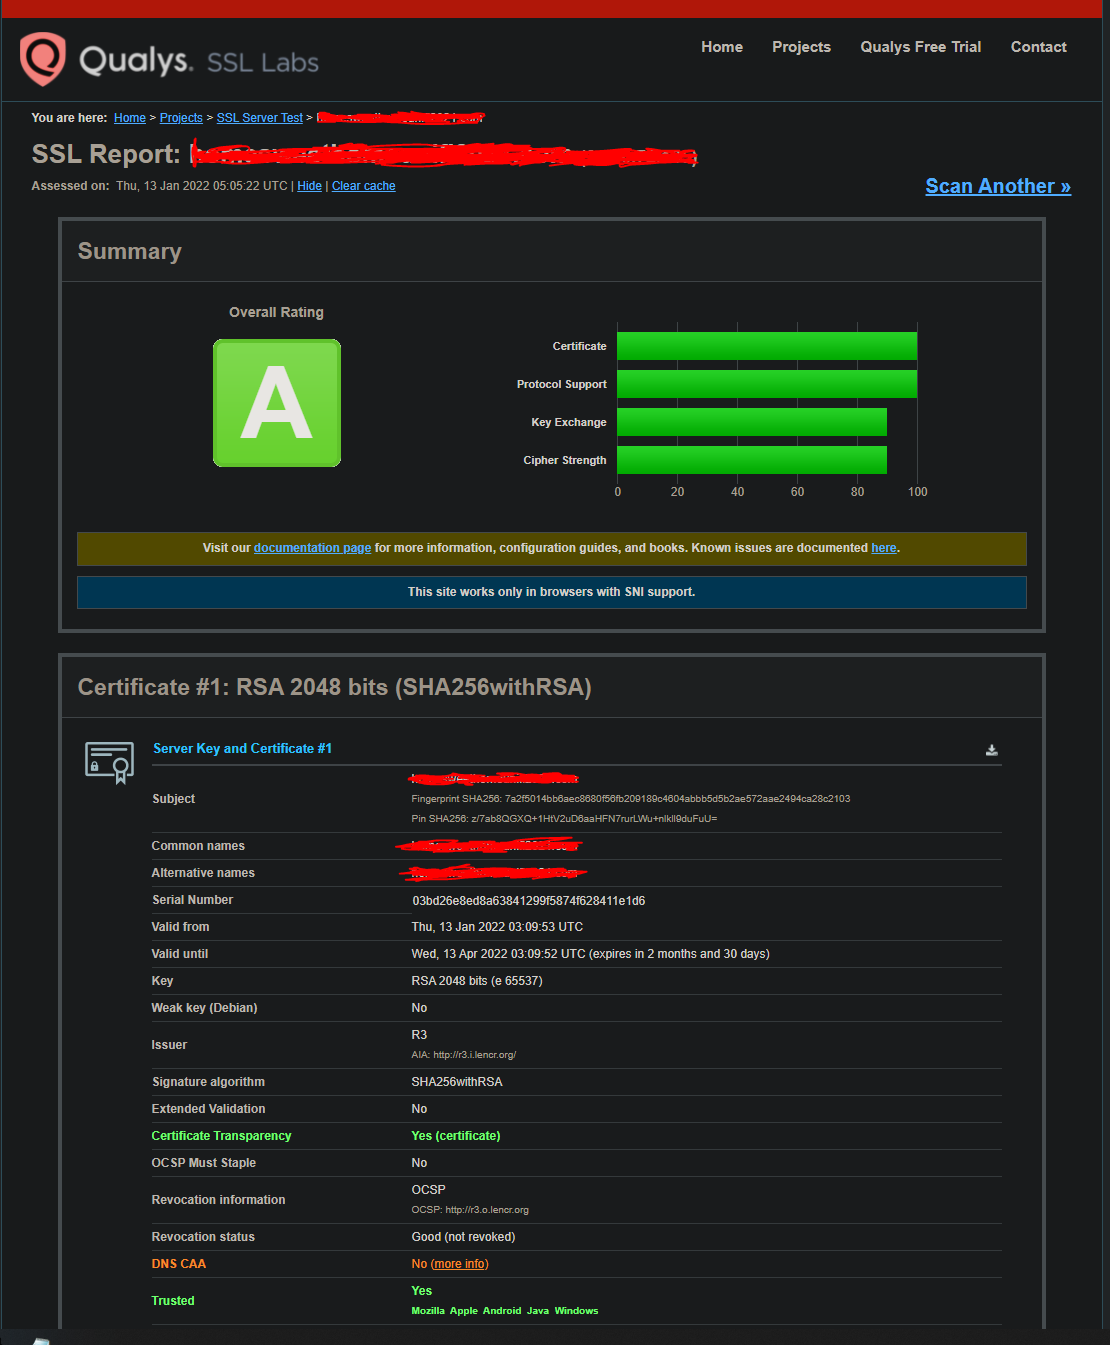
sudo /usr/local/bin/unifi_ssl_import.shYour UniFi site should now properly display a certificate! If you had the site bookmarked like me, you will need to delete the bookmark and bookmark it again for the new settings to take effect!
Extra
There are certain parts I did not bother completing as part of Chris's guide. However I did install haveged:
sudo apt install haveged -yas part of improving performance via entropy for our UniFi controller, and created a script for reimporting our certbot cert to UniFi when it renews automatically. Run this command and add the following lines:
sudo nano -w /etc/cron.daily/unifi_ssl_import
#!/bin/bash
/usr/local/bin/unifi_ssl_import.sh
Save and exit. Lastly run these commands to allow the script to be run as root with executable permissions:
sudo chown root:root /etc/cron.daily/unifi_ssl_import
sudo chmod +x /etc/cron.daily/unifi_ssl_import
More Work to Be Done
Not only did I realize how much more work needs to be done to further harden our server, in the end I realized that I didn't just secure an application. I was doing more and more each time and it still was not enough. The benefits are many both for the application our UniFi Cloud Controller and our server itself that hosts the application. This is why I titled this blog post as "killing two birds with one stone". In security you aren't just hammering away securing something alone. You are actually hammering away securing many layers that need to be firm or resilient to threats. This blog post is not to put down Ubiquiti in any shape or form. I have used their products at my last job and now use them at home. However it's important to scrutinize that having ingrained cyber hygiene should be part of every entity or organization or individual. We all have varying levels of knowledge in the field such as myself. I do not consider myself experienced as I am still fairly new to the field. Something that I should have taken action much more sooner than 6 months is something that for sure will help me grow as a person in this exciting yet daunting field. I hope this blog post serves as a detailed guide on just some security measures you can take when installing your UniFi Cloud Controller application in AWS. If anything I mentioned is wrong or could do better in, or I did not give proper credit, please contact me! Stay secure. :)
